Today I would like to share how to setup automatic deployments using Digital Ocean, GitHub and Travis CI. I will focus on the bare essentials, which can be tweaked and improved upon depending on your setup. This post is intended for beginners who are wanting to see how to put these things together.
To keep things simple and straight to the point, I will be deploying a static website. View the source code for this blog post.
Setup SSH
The first thing you’ll want to do is setup your SSH keys with ssh-keygen. If you don’t already have a pair setup, you can view this document.
Setup Your Digital Ocean Droplet
After you have your SSH key pair, you can head over to Digital Ocean and create a droplet. I’ve setup the following:
- Fedora Image
- Standard Plan – $5/mo
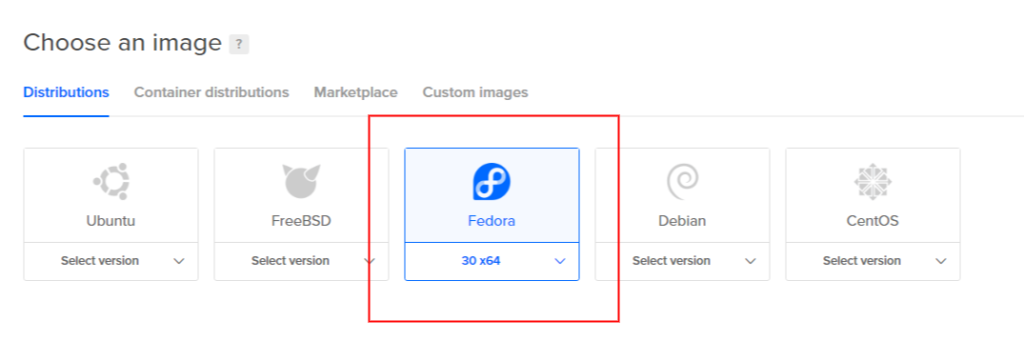

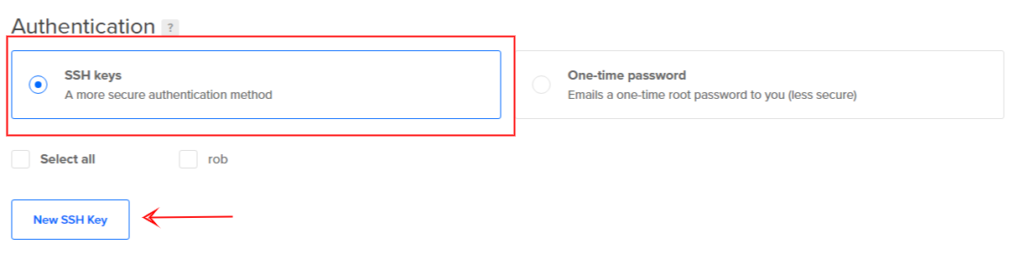
Under the Authentication section, select SSH Keys for the type. Click on the New SSH Key button to paste in your public key, id_rsa.pub. Confirm the default options for the rest of your settings and create your droplet.
You may now select your droplet to find out it’s IP Address. Mine happens to be 157.245.123.7.
SSH Into Your New Server
After logging in for the first time, it is a good practice to create a specific user for you to SSH in with. Then disable root SSH logins. This process is left out to keep things brief.
Verify that you can SSH into your server from your local development machine.
$ ssh root@157.245.123.7
One you’re logged in, update the system and install, start and enable Apache.
dnf -y update && dnf -y install httpd
systemctl start httpd
systemctl enable httpd
You should now be able to point your web browser to yours server’s IP Address and see Apache’s welcome page. If not, you may need to adjust your firewall rules on the server.
Create A Deployment User
Add a travis user, adding him to the apache group. This is the user that Travis CI will use to perform the deployment.
useradd -c "Travis CI Deployment User" -G apache travis
passwd travis
We know which group to add the user to by inspecting the httpd.conf file.
cat /etc/httpd/conf/httpd.conf | grep Group
Setup SSH For The Deployment User
Now setup an SSH Key pair for the travis user. Be sure to leave the password empty, so that Travis CI doesn’t need to enter anything when deploying.
mkdir /home/travis/.ssh

ssh-keygen
Generating public/private rsa key pair.
Enter file in which to save the key (/root/.ssh/id_rsa): /home/travis/.ssh/id_rsa
Enter passphrase (empty for no passphrase):
Enter same passphrase again:
Your identification has been saved in /home/travis/.ssh/id_rsa.
Your public key has been saved in /home/travis/.ssh/id_rsa.pub.
The key fingerprint is:
SHA256:M3uDwzHA28KgzavzPWGsbhnbO0QmfJ94nBTKyS1QXC8 root@fedora-s-1vcpu-1gb-nyc3-01
The key's randomart image is:
+---[RSA 3072]----+
|     o...        |
|    ... ..       |
|   ..+o+E..      |
|   +ooX+o.       |
|  . o*+*So       |
|    ..*o*B       |
|    .O o= o      |
|  ..=.+  o .     |
|  .=o o+         |
+----[SHA256]-----+
Append the public key to the authorized_keys file.
cat /home/travis/.ssh/id_rsa.pub >> /home/travis/.ssh/authorized_keys
chmod 0600 /home/travis/.ssh/authorized_keys
chown -R travis:travis /home/travis/.ssh
Quickly test that you can SSH with the travis user to your server.
ssh -i /home/travis/.ssh/id_rsa travis@157.245.123.7
Setup Folder Structure For The Deployments
We will be deploying to the /opt/example-app directory, and link the most recent deployment to /var/www/html/app.
Using symlinks is a common practice when laying out deployments because you can easily switch versions by changing the symlink reference.
mkdir -p /opt/example-app/v1
echo "Testing" >> /opt/example-app/v1/index.html

ln -sfn /opt/example-app/v1 /var/www/html/app

chown -R travis:apache /opt/example-app
chmod -R u=rwx,g=rwx,o=r /opt/example-app
chown -Rh travis:apache /var/www/html

echo "<VirtualHost *:80>
     DocumentRoot /var/www/html/app

     <Directory "/var/www/html/app">
         Options Indexes FollowSymLinks
         AllowOverride All
         Require all granted
     </Directory>
 </VirtualHost>" >> /etc/httpd/conf.d/app.conf

systemctl restart httpd
If you navigate your web browser to your server’s IP Address, you should see the updated page.
Create GitHub Repository
Now it is time to create a GitHub repository. I named mine example-app. On your local development machine, create a folder and run the following commands.
echo "# example-app" >> README.md
echo "Testing" >> index.html

git init
git add .
git commit -m "first commit"
git remote add origin https://github.com/[YOUR-GIT-USER]/example-app.git
git push -u origin master
Setup Travis CI
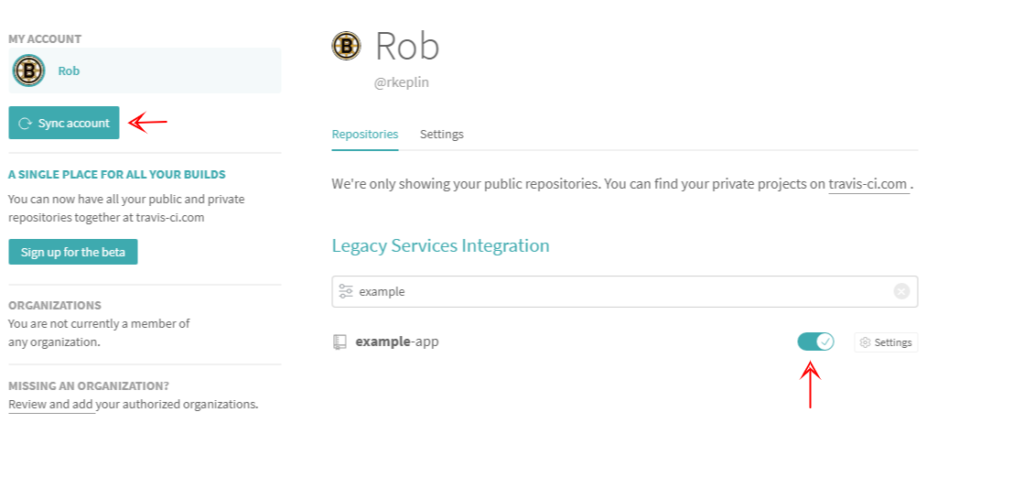
Jump over to Travis CI and log in with your GitHub credentials. Then navigate to Settings and click on the Sync account button. Your new repository should then show up in the list. Enable it by clicking on the radio button. Now your GitHub repository is ready to work with Travis CI.
Encrypt SSH Key For Travis User And Add It To GitHub Repository
In order to deploy your code, Travis CI will need the travis user’s SSH private key. Storing it in plain text in your public GitHub repository is… well, it’s not a good idea.
To get an idea of what we’re about to do, read through Encrypting Files.
We are going to create an encrypted version of the travis user’s SSH private key, add it to our GitHub repository, and Travis CI will unencrypt it during the deployment process.
To generate the encrypted file, we need to use the Travis CLI. I’ll use docker to help me out with this, since I do not have ruby on my machine.
Navigate to your project and create a .deploy folder.
mkdir .deploy
Download the private key and place it (temporarily!) in there:
scp root@157.245.123.7:/home/travis/.ssh/id_rsa .deploy/id_rsa
Spin up a ruby container, login to Travis CLI, and encrypt the private key:
docker run -it -v /opt/apps/example-app:/root ruby:latest bash

gem install travis
travis login --auto

travis encrypt-file /root/.deploy/id_rsa id_rsa.enc

Detected repository as rkeplin/example-app, is this correct? |yes| y
encrypting /root/.deploy/id_rsa for rkeplin/example-app
storing result as id_rsa.enc
storing secure env variables for decryption
Please add the following to your build script (before_install stage in your .travis.yml, for instance):
    openssl aes-256-cbc -K $encrypted_867d5633ae9d_key -iv $encrypted_867d5633ae9d_iv -in id_rsa.enc -out ~\/.deploy/id_rsa -d
Pro Tip: You can add it automatically by running with --add.
Make sure to add id_rsa.enc to the git repository.
Make sure not to add /root/.deploy/id_rsa to the git repository.
Commit all changes to your .travis.yml.
You’ll want to take note of the openssl command. It’s using newly created Travis CI environment variables, just for your repository.
openssl aes-256-cbc -K $encrypted_867d5633ae9d_key -iv $encrypted_867d5633ae9d_iv -in id_rsa.enc -out ~\/.deploy/id_rsa -d
Now don’t forget to REMOVE THE ID_RSA! You do not want this in your GitHub repository.
rm .deploy/id_rsa
Create The Deployment Script
Add the deploy.sh to the .deploy folder. It’s contents can be:
#!/bin/bash
openssl aes-256-cbc -K $encrypted_867d5633ae9d_key -iv $encrypted_867d5633ae9d_iv -in $(pwd)/.deploy/id_rsa.enc -out $(pwd)/.deploy/id_rsa -d

chmod 0400 $(pwd)/.deploy/id_rsa

SERVER_IP="157.245.123.7"

rsync -e "ssh -o StrictHostKeyChecking=no -o UserKnownHostsFile=/dev/null -i $(pwd)/.deploy/id_rsa" -avz --exclude '.deploy' --exclude '.git' $(pwd)/ travis@$SERVER_IP:/opt/example-app/$TRAVIS_BUILD_NUMBER
ssh -t -oStrictHostKeyChecking=no -i $(pwd)/.deploy/id_rsa travis@$SERVER_IP "chown -R travis:apache /opt/example-app/$TRAVIS_BUILD_NUMBER"
ssh -t -oStrictHostKeyChecking=no -i $(pwd)/.deploy/id_rsa travis@$SERVER_IP "ln -sfn /opt/example-app/$TRAVIS_BUILD_NUMBER /var/www/html/app"
ssh -t -oStrictHostKeyChecking=no -i $(pwd)/.deploy/id_rsa travis@$SERVER_IP "chown -h travis:apache /var/www/html/app"

rm -rf $(pwd)/.deploy/id_rsa
Add .travis.yml
Add the following .travis.yml to the root of your repository. Whenever you commit the master branch, the deployment script will run and deploy your changes to your droplet.
sudo: required
language: php

script:
- echo "No tests, just a deployment..."

deploy:
  provider: script
  script: bash $(pwd)/.deploy/deploy.sh
  on:
    branch: master
Commit And Push Changes
Commit your changes with the .deploy directory and .travis.yml file. Navigate to Travic CI and watch the build take off!